728x90
반응형
728x90
반응형
반응형

2022.03.16 - [개발/spring] - [spring] ChainedTransactionManager deprecated from boot 2.5


[spring] ChainedTransactionManager deprecated from boot 2.5

한 트랜젝션에서 서로 다른 DB에 update/insert 작업을 연속적으로 하게 될 때 이를 하나의 트랜젝션으로 보존할 수 있도록 스프링에서는 ChainedTransactionManager라는 클래스를 제공해주었다. 물론 이는

bangpurin.tistory.com

다중 DB의 트랜젝션 관리를 위해서 chainedTransactionManager를 사용 중에 있다.

오늘 라이브러리 수정 작업을 하면서 혹시 영향이 있을까 관련 테스트를 했는데, 중간에 exception을 던져도 rollback 되지 않고 commit이 되길래 이게 왜 안되지 싶었다.

하여 관련하여 구글링해보니 아래와 같은 글이 있었다.

1 - Change your exception to an unchecked exception (extends RuntimeException)
2 - Forces Spring to rollback a checked exception.

https://stackoverflow.com/questions/68001086/rollback-is-not-working-for-springboot-jparepository


Rollback is not working for Springboot JpaRepository

I have Spring Boot (v2.4.1) application with Hibernate and JpaRepository like Dao. Here is code: import javax.transaction.Transactional; @Service public class SomeService { pu...

stackoverflow.com


즉 checked exception인 Exception.class을 던지면 롤백이 안되고, Exception으로 롤백을 하고 싶다면 롤백 옵션을 줘야 한다는 것..

이것도 모르고 throw new Exception 이렇게 테스트를 했으니.. 당연히 안되었던 것이다..ㅎ

무튼 아래와 같이 RuntimeException을 발생시켜서 롤백이 잘 되는지 확인하였다.

@Transactional(transactionManager = Constants.CHAINED_TRANSACTION_MANAGER)
public BaseResponse resetLossMoney(ResetLossMoneyRequest req) throws Exception {
    checkExpiredDateAndSave(req.getCi());
    setChangedAndSave(req.getCi());
    if(1==1) throw new RuntimeException("test");
    insertResetLossMoneyLog(req.getCi(), GID_DEFAULT);
    return new BaseResponse();
}


위 내용과 별도로 트랜젝션이 잘 되는지 확인하고 싶다면 로그백에 아래를 추가하면 확인 가능하다.

<logger name="org.springframework.transaction.interceptor" level="TRACE"/>


  • 스프링 프레임워크에서는 기본적으로 Unchecked Exception(런타임 예외)이 발생하면 트랜잭션을 롤백합니다.
  • 반면, Checked Exception(체크드 예외)은 기본적으로 트랜잭션을 롤백하지 않습니다. 이는 Checked Exception이 비즈니스 로직 내에서 예외적인 상황으로 처리될 수 있기 때문입니다.
  • checked exception에서도 롤백이 필요하다면 rollbackFor을 활용하면 된다.
@Transactional(rollbackFor = IOException.class)
public void performTransaction() throws IOException {
    repository.save(new Entity());

    // Checked Exception 발생
    if (true) {
        throw new IOException("Checked Exception");
    }

    repository.save(new Entity());
}


  •  특정 Unchecked Exception에 대해서는 롤백을 원하지 않을 때 noRollbackFor 속성을 사용합니다.

왜 기본적으로 Unchecked Exception에 대해서만 롤백할까?

  1. 비즈니스 로직과의 분리: Checked Exception은 비즈니스 로직 내에서 발생할 수 있는 예외적인 상황을 나타내며, 이를 비즈니스 로직의 일부로 처리하는 경우가 많습니다. 반면, Unchecked Exception은 예외적 상황이 아니라 코드의 오류나 논리적 문제를 나타내므로 트랜잭션의 롤백이 필요합니다.
  2. 복구 가능성: Checked Exception은 복구 가능한 예외로 간주되어, 개발자가 예외를 처리하여 정상적인 흐름으로 돌아갈 수 있다고 판단할 수 있습니다. Unchecked Exception은 복구가 불가능한 예외로 간주되어 트랜잭션을 롤백하는 것이 합리적입니다.
728x90
반응형
반응형

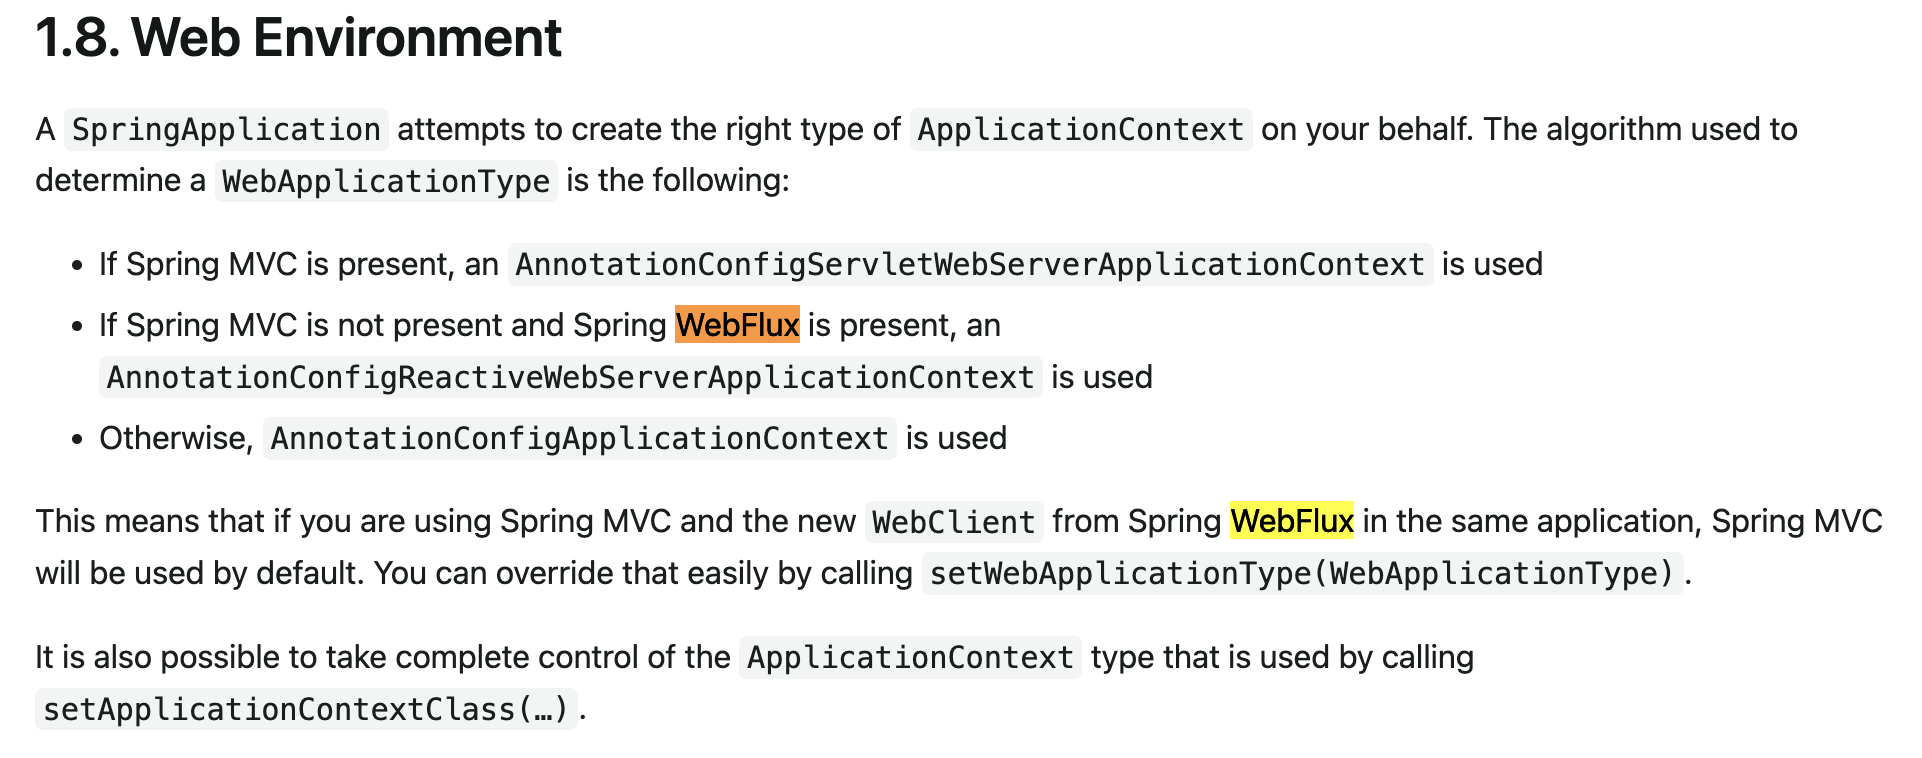
spring mvc 기반 spring-web의 restTemplate으로 api를 요청하고 있던 와중, restTemplate가 deprecated 된다는 말을 듣고, 대체제인 webClient를 사용해보려고 공부를 하다 보니 webflux의 영역에 들어와 버렸다. 물론 webClient도 sync call을 지원하지만 수많은 api 콜을 비동기로 하면 자연스레 내 api의 속도도 빨라질 것이 아닌가? 위기를 기회로 전환하며 새로운 아키텍처를 익히려고 spring-webflux를 추가하였다.

그런데 spring reactive강의를 듣던 도중, 두 dependency는 spring context의 혼란을 야기하므로 같이 사용하면 안 된다는 말을 들었다. 오래된 강의긴 했지만 나름 스프링 저명인사가 말한 것이기에 안되리라 생각하고 좌절하며 관련 내용을 더 찾아보기로 했다.


1. spring mvc vs spring webflux

https://docs.spring.io/spring-boot/docs/current/reference/html/features.html#web

spring mvc가 있으면 mvc가 우선순위가 높고 webflux만 있으면 webflux를 쓴다고 한다. 즉, 둘 다 있으면 mvc가 우선 순위다.

근데 애초에 같이 있어도 된다는 전제를 한다면 같이 써도 된다는 것 아닌가?!


2. spring mvc with webclient

https://docs.spring.io/spring-framework/docs/current/reference/html/web-reactive.html

스프링 공식문서에 spring mvc + webclient형식으로 같이 써도 된다는 글이 있다.. 하하하하하 살았다.


그리고 스프링에서 같이 쓰는 동영상을 올린 적이 있다(물론 주내용은 springboot2에 대한 데모지만)

26분부터~ restTemplate -> webClient 바꾸는 내용 하면서 언급함.


spring mvc에 webClient를 써야 하는가에 대한 많은 토론

https://stackoverflow.com/questions/51953826/resttemplate-vs-webclient-benefits-in-servlet-based-web-mvc-app


RestTemplate vs WebClient benefits in Servlet based web-mvc app

I'm looking for a clarification on the bolded text in the statement below (I've provided the full paragraph for context only): The RestTemplate is not a good fit for use in non-blocking applicat...

stackoverflow.com


728x90
반응형

'개발 > reactive' 카테고리의 다른 글

[webflux] block vs toFuture  (0) 2022.03.31
[webflux] 실무투입고민  (0) 2022.03.30
[reactive] 10. Flux  (0) 2022.03.25
[reactive] 9. Mono  (0) 2022.03.23
[reactive] 8. webflux  (0) 2022.03.22
반응형

이전 글: 2022.03.23 - [개발/reactive] - [reactive] 9. Mono


[reactive] 9. Mono

이전 글: 2022.03.22 - [개발/reactive] - [reactive] 8. webflux [reactive] 8. webflux 이전 글: 2022.03.21 - [분류 전체보기] - [reactive] 7. CompletableFuture [reactive] 7. CompletableFuture 이전 글:..

bangpurin.tistory.com


오늘은 flux의 간단한 사용법을 배운다.

 A Flux object represents a reactive sequence of 0.. N items,
while a Mono object represents a single-value-or-empty (0.. 1) result.

Mono와 Flux의 차이를 검색해보면, mono는 하나의 값을 return할return 할 때 쓰이는 반면 flux는 n개의 값을 return 할 때 쓰인다고 나온다. 그런데 사실 두 차이를, 어쩌면 그 의미를 잘 모르겠다. 아래의 예시에서는 같은 결과를 mono/flux로 각각 작성 가능하다는 것을 보여준다. 차이는 flux를 쓰면 flux라이브러리의 다양한 오퍼레이션 함수를 사용할 수 있다고 하는데, 데이터를 수정 없이 그대로 내린다면 mono나 flux나 그게 그거 아닌가..?

@GetMapping("/event/{id}")
Mono<List<Event>> hello(@PathVariable long id){
    //return Mono.just(new Event(id, "event "+ id));
    List<Event> list = Arrays.asList(new Event(1L, "event1"), new Event(2L, "event2"));
    //데이터를 컬랙션으로 묶어서 다루고, 각 데이터 다루거나 편집할 때 힘듦
    return Mono.just(list);
}

@GetMapping(value = "/events")
Flux<Event> events(){
    List<Event> list = Arrays.asList(new Event(1L, "event1"), new Event(2L, "event2"));
    //data stream -> .map 등 사용 가능
    return Flux.fromIterable(list);
    //같은 결과
    //return Flux.just(new Event(1L, "event1"), new Event(2L, "event2"));
}

@Data
@AllArgsConstructor
public static class Event{
    long id;
    String value;
}

위와 같이 작성하고 두 api를 요청했을 때, 같은 응답 결과가 내려온다.

toby1 % curl localhost:8080/events
[{"id":1,"value":"event1"},{"id":2,"value":"event2"}]                                                                                                                                             nhn@AL01590036 toby1 % curl localhost:8080/events


events의 데이터 타입을 바꾸면

@GetMapping(value = "/events", produces = MediaType.TEXT_EVENT_STREAM_VALUE)
Flux<Event> events(){
    List<Event> list = Arrays.asList(new Event(1L, "event1"), new Event(2L, "event2"));
    //data stream -> .map 등 사용 가능
    return Flux.fromIterable(list);
    //return Flux.just(new Event(1L, "event1"), new Event(2L, "event2"));
}
toby1 % curl localhost:8080/events
data:{"id":1,"value":"event1"}

data:{"id":2,"value":"event2"}

데이터가 나눠서 들어오는 것을 볼 수 있다.

자바 8의 stream의 기능을 써서 조금 더 수정해보면 아래와 같다.

@GetMapping(value = "/events", produces = MediaType.TEXT_EVENT_STREAM_VALUE)
Flux<Event> events(){
    //데이터생성 using stream
    //Stream<Event> s = Stream.generate(() -> new Event(System.currentTimeMillis(), "val"));
    //data stream -> .map 등 사용 가능; 위와 동일한 결과
    //return Flux.fromStream(Stream.generate(() -> new Event(System.currentTimeMillis(), "val")).limit(10));
    return Flux //server sent event
            .fromStream(Stream.generate(() -> new Event(System.currentTimeMillis(), "val")))
            .delayElements(Duration.ofSeconds(1))//background thread를 별도로 만들어서 처리
            .take(10);//10개의 request를 보내고 다 오면 cancel 처리
}

stream을 드러내고 flux 기능만을 사용하면 아래와 같겠다.

@GetMapping(value = "/events", produces = MediaType.TEXT_EVENT_STREAM_VALUE)
Flux<Event> events(){
   return Flux //server sent event
            //.range(1, 10) 앞에서 미리 정하고 들어갈 수도 있음;
            //.<Event>generate(sink -> sink.next(new Event(System.currentTimeMillis(), "value")))//데이터를 계속 흘러서 보내는 역할; type hint 줘야함
            //상태값을 바꿔서 리턴; 초기상태, 상태 바꿔주는 함수 그담 상태 리턴
            .<Event, Long>generate(()->1L, (id, sink) -> {
                sink.next(new Event(id, "value" + id));//값을 받아 이벤트를 생성해서 싱크로 보내고
                return id+1;//다음 상태 리턴; id로 들어가겟지
            })
            .delayElements(Duration.ofSeconds(1))//background thread를 별도로 만들어서 처리
            .take(10);//10개의 request를 보내고 다 오면 cancel; 뒤에서 끊는 개념
}

flux의 zip을 활용하면 아래 두 가지 방법이 가능하다.

@GetMapping(value = "/events", produces = MediaType.TEXT_EVENT_STREAM_VALUE)
Flux<Event> events(){
   Flux<Event> es = Flux //server sent event
            //상태값을 바꿔서 리턴; 초기상태, 상태 바꿔주는 함수 그담 상태 리턴
            .<Event, Long>generate(()->1L, (id, sink) -> {
                sink.next(new Event(id, "value" + id));//값을 받아 이벤트를 생성해서 싱크로 보내고
                return id+1;//다음 상태 리턴; id로 들어가겟지
            })
            //.delayElements(Duration.ofSeconds(1))//background thread를 별도로 만들어서 처리
            //.take(10);//10개의 request를 보내고 다 오면 cancel; 뒤에서 끊는 개념
    ;
    Flux<Long> interval = Flux.interval(Duration.ofSeconds(1));
    //결합해서 delay의 효과를 볼 수 있음
    return Flux.zip(es, interval).map(tu -> tu.getT1());
}
@GetMapping(value = "/events", produces = MediaType.TEXT_EVENT_STREAM_VALUE)
Flux<Event> events(){
    Flux<String> es = Flux.generate(sink -> sink.next("value"));
    Flux<Long> interval = Flux.interval(Duration.ofSeconds(1)); //0부터 시작
    //event 조합
    return Flux.zip(es, interval).map(tu -> new Event(tu.getT2(), tu.getT1())).take(10);
}

비슷한 내용 테스트

https://www.devkuma.com/docs/spring-webflux/


Spring WebFlux의 간단한 사용법

여기서는 Spring WebFlux의 간단한 사용법에 대해 소개하겠다. Spring WebFlux는 Spring 5에서 추가된 논블로킹(Non-Blocking) 런타임에서 리액티브 프로그래밍을 할 수 있는 새로운 Web 프레임워크이다. 위의

www.devkuma.com


728x90
반응형

'개발 > reactive' 카테고리의 다른 글

[webflux] 실무투입고민  (0) 2022.03.30
[spring] spring-web and spring-webflux  (0) 2022.03.25
[reactive] 9. Mono  (0) 2022.03.23
[reactive] 8. webflux  (0) 2022.03.22
[reactive] 7. CompletableFuture  (0) 2022.03.21
반응형

Rest로 api를 요청할 때 request parameter type에 어떻게 가변 변수를 넣는지에 대한 고찰.


1. PATH param

url 자체에 가변 변수가 포함되어 있는 경우, resource를 식별할 때 사용

GET /employee/{employeeID} 와 같은 꼴..

url 부분에 중괄호로 변수 위치를 표시하고 아래에서는 타입을 TEMPLATE으로 선택해야 한다. 가변 변수이므로 value 부분에 어떤 값이 올지 지정해줘야 한다.


2. QUERY param

GET /employee?designation={name} 과 같이? 뒤에 key=value 구조로 이루어진 부분; 정렬이나 필터링을 할 때 사용

type을 QUERY로 지정하고 value 부분에 역시 어디서 데이터를 가져올지 명시해준다. 위의 parameter 부분에는 (dataGen의 경우) default로 지정한 게 나온다.


참고: 

https://www.soapui.org/docs/rest-testing/understanding-rest-parameters/


Understanding REST Parameters | Documentation | SoapUI

Article Index PLAIN Parameters Parameter Level: RESOURCE and METHOD You use request parameters to set varying parts in simulated requests. SoapUI supports the following parameter types: QUERY TEMPLATE HEADER MATRIX You can find them in the request editor:

www.soapui.org


728x90
반응형

'서버 세팅 & tool > readyapi' 카테고리의 다른 글

groovy basics  (0) 2022.03.24
반응형

테스트 자동화 툴인 ReadyAPI(soupUI)에는 script 언어로 groovy가 쓰인다.

아무래도 원하는 바를 쉽게 하려면 groovy를 조금이라도 아는 게 중요, 지인짜 기본적인 것만 언급한다.


  • 코드 끝에 세미콜론 있어도 되고 없어도 되고..
  • 주석
//한줄

/* 여러줄
애해해
ㅇㅇㅇ*/
  • 로그
//()가 있어도 되고 
log.info("Result :" + c);
//괄호를 생략해도 가능
log.info "soapUI script"
log.info "aa" + c
  • 변수 선언 def
  • string to json
import groovy.json.JsonSlurper

def resResponse = "{'a':'bb', 'n':3}"
//string 형태의 json을 진짜 json으로 바꿔주는 lib.function
def json = new JsonSlurper().parseText(restResponse)

//이후에는 json 접근하 듯 접근 가능
log.info json.a
//결과: bb


나머지는 java랑 비슷, 단 stream 쓸 때 {it -> } 로 내부 변수명이 it로 지정되어 있고 별도의 함수가 있는 듯 하다.

https://dzone.com/articles/java-lambda-streams-and-groovy-clauses-comparisons


Java Lambda Streams and Groovy Closures Comparisons - DZone Java

This post takes a look at creating and implementing lambda streams in both Java and Groovy, determining that Groovy provides more terse code overall.

dzone.com


ReadyApi에서 제공하는 library

단점은 각 라이브러리에 뭐가 있는지 알기가 어렵다....

기본적으로 많이 쓸 아이들은 아래와 같다.

  • api 결과 가져오기
//api결과를 스트링으로 가져와서 변수 선언
def restResponse = testRunner.testCase.testSteps["Rest 이름"].testRequest.response.contentAsString
//아래도 동일.. 스트링으로 가져온다
def restResponse = testRunner.testCase.testSteps["Rest 이름"].testRequest.response.responseContent
  • 테스트 케이스 변수로 선언하기
//변수를 꺼내다가 프로퍼티로 선언하는 방법
testRunner.testCase.setPropertyValue("aspId", activeList[i])


기타 문법..

https://www.soapui.org/docs/scripting-and-properties/tips-tricks/


ReadyAPI: Properties & Scripting Samples | SoapUI

NOTE: Some of the scripts in this section relate to standalone SoapUI Pro, which is now part of the ReadyAPI application suite. To try the new functionality, feel free to download the trial version of ReadyAPI from our web site. Accessing Properties 1.1 Ge

www.soapui.org


https://intersog.com/blog/how-to-use-groovy-scripts-in-soapui-for-test-requests/


How to Use Groovy Scripts in SoapUI for Test Requests - Intersog

Learn how you should use SoapUI Groovy scripts to conduct test requests. ✔Step-by-step guide ✔Code examples.

intersog.com


728x90
반응형

'서버 세팅 & tool > readyapi' 카테고리의 다른 글

[readyApi] request parameter  (0) 2022.03.24
반응형

이전 글: 2022.03.22 - [개발/reactive] - [reactive] 8. webflux


[reactive] 8. webflux

이전 글: 2022.03.21 - [분류 전체보기] - [reactive] 7. CompletableFuture [reactive] 7. CompletableFuture 이전 글: 2022.03.21 - [개발/reactive] - [reactive] 6. refactoring [reactive] 6. refactoring..

bangpurin.tistory.com


mono

//publisher -> publisher ... -> subscriber 시 실행

m = mono
    .just(genHello())  //미리 준비하는.. 그 안의 함수도 미리 실행해서 준비해둠 genHello -> mono
    .fromSupplier(()-> genHello()) //mono -> genHello 람다식을 던져야 함수가 그 때 실행해

    //(==) 람다식의 의미는 아래와 같음
    .fromSupplier(new Supplier<String>(){
        public String get(){
            return genHello()
        }
    })

m.subscribe();
log.info("pos2")
return m; //spring 이 subscribe


위 처럼 subscribe가 중간에 있다면 어떻게 실행될까
: 두 번 실행됨
subscribe -> pos2 -> subscribe

같은 내용이라 두 번 실행을 막고 싶으면,
m.subscribe 내용을 따로 담고 그 내용을 Mono.just로 감싸서 return 하면 됨

모노 컨테이너 안의 데이터를 빼야겠어
 = mono.block
block 내부에서 subscribe가 실행되면서 내용을 꺼냄


hot publisher vs cold publisher

  • cold는 replay 데이터를 처음부터 다시 생성해줌
  • hot은 구독하는 시점부터 데이터를 줌; 처음부터 주는거 아님


subscribe vs block?

  • subscribe은 스케줄러(쓰레드 모드) 설정에 따라서 블록을 할 수도, 안 할 수도 있음. 결과는 람다식으로 받기 때문에 반드시 블록하지 않아도 됨. 
  • 반면에 block은 결과를 람다식에서 콜백으로 받는 게 아니라, 값을 꺼내서 변수 등으로 넘겨야하기 때문에 해당 쓰레드는 블록됨.


728x90
반응형

'개발 > reactive' 카테고리의 다른 글

[spring] spring-web and spring-webflux  (0) 2022.03.25
[reactive] 10. Flux  (0) 2022.03.25
[reactive] 8. webflux  (0) 2022.03.22
[reactive] 7. CompletableFuture  (0) 2022.03.21
[reactive] 6. refactoring  (0) 2022.03.21
반응형

이전 글: 2022.03.21 - [분류 전체보기] - [reactive] 7. CompletableFuture


[reactive] 7. CompletableFuture

이전 글: 2022.03.21 - [개발/reactive] - [reactive] 6. refactoring [reactive] 6. refactoring 이전 글: 2022.03.18 - [개발/reactive] - [reactive] 5. 비동기 RestTemplate과 비동기 MVC/Servlet [reactive..

bangpurin.tistory.com


저번 시간에 작성한 application을 webflux로 바꿔보는 작업을 진행한다.

springboot2.6.4로 진행하였기 때문에 유튜브와 다르게 아래의 의존성을 추가했다. 

implementation 'org.springframework.boot:spring-boot-starter:2.6.4'
//   implementation 'org.springframework.boot:spring-boot-starter-web:2.6.4'
implementation "org.springframework.boot:spring-boot-starter-webflux:2.6.4"

spring-webflux는 기본 서버가 netty라서 모두 네티로 작업하였다.

그리고 설정명이 달라서 수정하였다. 아래 소스를 참고!

@Slf4j
@EnableAsync
@SpringBootApplication
public class Application {

    @RestController
    public static class MyController{

        @Autowired
        MyService myService;

        WebClient client = WebClient.create();

        static final String URL1 = "http://localhost:8081/service?req={req}";
        static final String URL2 = "http://localhost:8081/service2?req={req}";

        @GetMapping("/rest")
        public Mono<String> rest(int idx) {
            //이것만으로는 api 쏘지 않음
            Mono<ClientResponse> r = client.get()
                    .uri(URL1, idx)
                    .exchange();
            //container안의 원소를 받아서 변환해서 다시 container(모노) 담아서 리턴 Mono<Mono<String>>
            //이중으로 감싸주는 것은 원하는 결과가 아니니 flatmap으로 작업해서 하나로 합쳐야 함
            Mono<String> body = r
                    .flatMap(clientResponse -> clientResponse.bodyToMono(String.class))  //Mono<String>
                    .doOnNext(c -> log.info(c))
                    .flatMap(res1 -> client.get().uri(URL2, res1).exchange())            //Mono<ClientResponse>
                    .flatMap(c -> c.bodyToMono(String.class))                            //Mono<String>
                    .doOnNext(c -> log.info(c))
                    .flatMap(res2 -> Mono.fromCompletionStage(myService.work(res2)))     //completable<String> -> mono<String>
                    .doOnNext(c -> log.info(c))
                    ;

            //return 시 모노면 그때 subscribe 수행함
            //mono subscribe 를 spring이 실행해줌
            return body;
        }

    }

    @Service
    public static class MyService{
        //또다른 스래드 비동기 작업 시 async
        @Async
        public CompletableFuture<String> work(String req){
            return CompletableFuture.completedFuture(req + "/asyncwork");
        }
    }

    public static void main(String[] args) {
        System.setProperty("reactor.netty.ioWorkerCount", "1");
        System.setProperty("reactor.netty.pool.maxConnections", "2000");
        SpringApplication.run(Application.class, args);
    }
}

참고로 위 코드는 아래 코드를 수정한 것이다.

소스를 살펴보면 mono의 map과 flatmap의 사용 차이를 느낄 수 있을 것이다.

@GetMapping("/rest")
public Mono<String> rest(int idx) {
    Mono<ClientResponse> r = client.get()
            .uri(URL1, idx)
            .exchange();

    Mono<String> body = r
            .flatMap(clientResponse -> clientResponse.bodyToMono(String.class))  //Mono<String>
            .flatMap(res1 -> client.get().uri(URL2, res1).exchange())            //Mono<ClientResponse>
            .flatMap(c -> c.bodyToMono(String.class))                            //Mono<String>
            .map(res2 -> myService.work(res2))
            ;

    return body;
}
////////////////////////

@Service
public static class MyService{
    public String work(String req){
        log.info("myservice {}" , req);
        return req + "/asyncwork";
    }
}


map과 flatmap의 차이는 아래 링크에서 자세히 확인 가능하다. 스트림으로서의 차이는 이해했는데 동기/비동기에 대해서는 아직 잘 모르겠다.

https://www.geeksforgeeks.org/difference-between-map-and-flatmap-in-java-stream/


Difference Between map() And flatMap() In Java Stream - GeeksforGeeks

A Computer Science portal for geeks. It contains well written, well thought and well explained computer science and programming articles, quizzes and practice/competitive programming/company interview Questions.

www.geeksforgeeks.org

https://luvstudy.tistory.com/95


Reactor map, flatMap method는 언제 써야할까?

webflux로 서비스를 만들어보면서 map과 flatMap을 언제 써야 할지 헷갈릴 때가 있어 공부한 내용을 정리함. map과 flatMap은 둘 다 스트림의 중간에 값을 변환해주는 역할을 한다. map은 1 : 1로 반환을 보

luvstudy.tistory.com


728x90
반응형

'개발 > reactive' 카테고리의 다른 글

[reactive] 10. Flux  (0) 2022.03.25
[reactive] 9. Mono  (0) 2022.03.23
[reactive] 7. CompletableFuture  (0) 2022.03.21
[reactive] 6. refactoring  (0) 2022.03.21
[reactive] 5. 비동기 RestTemplate과 비동기 MVC/Servlet  (0) 2022.03.18
반응형

이전 글: 2022.03.21 - [개발/reactive] - [reactive] 6. refactoring


[reactive] 6. refactoring

이전 글: 2022.03.18 - [개발/reactive] - [reactive] 5. 비동기 RestTemplate과 비동기 MVC/Servlet [reactive] 5. 비동기 RestTemplate과 비동기 MVC/Servlet 오늘은 5강을 이어서 학습한다. 1. default, block..

bangpurin.tistory.com


CompletableFuture

  • 비동기 시작 supplyAsync vs runAsync
    • supplyAsync: 파라미터로 supplier 인터페이스 받고 반환 값(CompletableFuture <T>) 존재
    • runAsync: 파라미터로 runnable 인터페이스 받고 반환 값없음
  • 채이닝, 후속작업 thenApply vs thenAccept vs thenRun vs thenCompose vs thenCombine
    • thenApply: 데이터를 포함하는 future 반환(CompletableFuture <U>)
    • thenAccept: 파라미터로 Comsumer 받고 반환 값없음 (CompletableFuture <Void>)
    • thenRun: 파라미터로 runnable 받고 반환 값없음
    • thenCompose: 앞 단계의 CompletableFuture을 주고받고 하면서 순차적으로 연결 가능
    • thenCombine: 전혀 다른 CompletableFuture을 첫 인자로 받고, 결과를 연산하는 bifunction을 두 번째 인자로 받음
  • 데이터 가져오기(blocking) get vs join
    • get: checkedException 던지기 때문에 try/catch 처리 필요
    • join:  uncheckedException 던짐; 예외처리가 내부적
  • 감싸기 completedFuture: 이미 완료된 작업이나 정적인 값을 CompletableFuture로 감쌀 때
  • 예외 발생 시 exceptionally vs handle
    • exceptionally: 예외 발생 시 해당 예외를 받아서 처리 가능
    • handle: s, e를 다 받는 bifunction 구현체
  • 별도의 스레드 풀에서 작업 시 ~async 메서드
    • 다른 스레드가 후속 작업을 진행
    • thenApplyAsync
  • 여러 CompletableFuture을 병렬로 실행하고 모든 프로세스가 끝나길 기다렸다가(blocking) 처리하려면 allOf


연습 코드

   ExecutorService es = Executors.newFixedThreadPool(10);
    //Future 비동기 작업 결과를 담고있는 오브젝트 get -> blocking
    //listenable future 콜백; 완료 시점에
    //CompletableFuture 비동기 작업의 결과를 간단하게 만들 수
    //리스트의 모든 값이 완료될 때까지 기다릴지 아니면 하나의 값만 완료되길 기다릴지 선택할 수 있다는 장점
    //병렬성과 동시성에서 CP가 의미있는데, 여러 cpu core 사이에 지연실행이나 예외를 callable하게 처리할 수 있어서 명시적인 처리가 가능

    //completion station? stage? 장점은 코어성능 20% 더 효율적임
    //then ~ 이전의 스레드를 사용
    //then~async 하면 정책에 따라 새로운 스래드 할당
    CompletableFuture
            .supplyAsync(() -> {
                log.info("run");
                //if(1==1) throw new RuntimeException(); //exception으로 감
                return 1; //생성
            })
            .thenCompose(s -> { //compose 하면 completedfutre의 값만 넘김
                log.info("then {}", s);
                return CompletableFuture.completedFuture(s + 1); //받아서 작업하고 넘기고
            })
            .thenApply(s3 -> {
                log.info("then3 {}", s3);
                return s3 * 10; //받아서 작업하고 넘기고
            })
            .exceptionally(e -> -10) //예외발생하면 복구할 때 사용가능
            .thenAcceptAsync(s2 -> log.info("thenn2 {}", s2), es) //받아서 끝 어떤 스래드풀인지 알려줘야
    ;
    log.info("exit");


이전 시간에 작성한 코드를 CompletableFuture 방식으로 바꿔본다. 수정된 부분 위주로 작성한다.

///before
@GetMapping("/rest")
public DeferredResult<String> rest(int idx) {
    log.info("/rest {}", idx);
    DeferredResult<String> dr= new DeferredResult<>();

    ListenableFuture<ResponseEntity<String>> f1 = rt.getForEntity(URL1, String.class, "f1" + idx);
    f1.addCallback(s -> {
        ListenableFuture<ResponseEntity<String>> f2 = rt.getForEntity(URL2, String.class, s.getBody());
        f2.addCallback(s2 -> {
            ListenableFuture<String> f3 = myService.work(s2.getBody());
            f3.addCallback(s3 -> {
                dr.setResult(s3);
            }, e3 -> {
                dr.setErrorResult(e3.getMessage());
                    }
            );
        }, e2-> {
            dr.setErrorResult(e2.getMessage());
        });
    }, e-> {
        //throw 하면 어디서 에러가 난지 알 수 없어 비동기라
        dr.setErrorResult(e.getMessage());
    });
    return dr;
}
///after
@GetMapping("/rest")
public DeferredResult<String> rest(int idx) {
    log.info("/rest {}", idx);
    DeferredResult<String> dr= new DeferredResult<>();

    toCF(rt.getForEntity(URL1, String.class, "f1" + idx))
            .thenCompose(s -> {
                if(1==1) throw new RuntimeException("ERROR");
                return toCF(rt.getForEntity(URL2, String.class, s.getBody()));
            })
          //  .thenCompose(s2 -> toCF(myService.work(s2.getBody())))
            .thenApplyAsync(s2 -> myService.work(s2.getBody()))
            .thenAccept(s3 -> dr.setResult(s3))
            .exceptionally(e -> {
                dr.setErrorResult(e.getMessage());
                return null;
            })
    ;

    return dr;
}

//lf -> cf 변환
<T> CompletableFuture<T> toCF(ListenableFuture<T> lf){
    CompletableFuture<T> cf = new CompletableFuture<T>(); //작업의 결과를 나타내는거지 비동기 작업자체는 아님
    lf.addCallback(s -> {cf.complete(s);}, e -> {cf.completeExceptionally(e);});
    return cf;
}

////
@Service
public static class MyService{
    //@Async //cf를 쓴다면 동기로 하고 위에서 적용하는것도 방법
    public String work(String req){
        log.info("myservice {}" , req);
      //  return new AsyncResult<String>(req + "/asyncwork");
        return req + "/asyncwork";
    }
}

참고

https://brunch.co.kr/@springboot/267


CompletableFuture

자바 비동기 프로그래밍을 위한 CompletableFuture 검토 | 필자는 최근에 CompletableFuture 를 사용해서 개발을 진행하였는데, CompletableFuture는 작년에 한번 사용한 이후로는 실무에서 사용할 일이 거의

brunch.co.kr

https://wbluke.tistory.com/50


CompletableFuture 톺아보기

CompletableFuture 학습 테스트 안녕하세요! 이번 포스팅에서는 학습 테스트를 통해 CompletableFuture를 알아보는 시간을 가져보려고 합니다. 모든 코드는 GitHub에 있으니 참고하시면 됩니다. CompletableFutur

wbluke.tistory.com


728x90
반응형
반응형

이전 글: 2022.03.18 - [개발/reactive] - [reactive] 5. 비동기 RestTemplate과 비동기 MVC/Servlet


[reactive] 5. 비동기 RestTemplate과 비동기 MVC/Servlet

오늘은 5강을 이어서 학습한다. 1. default, blocking request 아래 그림처럼 2초씩 지연이 있는 /service를 요청하는 /rest를 100건 rest template로 요청한다. /rest의 스래드가 한 개라서 2초씩 대기한다. @Sl..

bangpurin.tistory.com


이전 글의 콜백 지옥을 새로운 클래스 선언을 통해 리팩토링해본다.

//////////////before
ListenableFuture<ResponseEntity<String>> f1 = rt.getForEntity(URL1, String.class, "f1" + idx);
f1.addCallback(s -> {
    ListenableFuture<ResponseEntity<String>> f2 = rt.getForEntity(URL2, String.class, s.getBody());
    f2.addCallback(s2 -> {
        ListenableFuture<String> f3 = myService.work(s2.getBody());
        f3.addCallback(s3 -> {
            dr.setResult(s3);
        }, e3 -> {
            dr.setErrorResult(e3.getMessage());
                }
        );
    }, e2-> {
        dr.setErrorResult(e2.getMessage());
    });
}, e-> {
    //throw 하면 어디서 에러가 난지 알 수 없어 비동기라
    dr.setErrorResult(e.getMessage());
});

///////////after
Completion
    //최초 실행
    .from(rt.getForEntity(URL1, String.class, "f1" + idx))
    //두번재 받아서 작업하고 return 해야함
    .andApply(s -> rt.getForEntity(URL2, String.class, s.getBody()))
    //어디서든 에러가 나면
    .andError(e -> dr.setErrorResult(e.toString()))
    //수행만하고 끝내는 아이 consumer
    .andAccept(s -> dr.setResult(s.getBody()));
public static class AcceptCompletion extends Completion{
    Consumer<ResponseEntity<String>> con;
    public AcceptCompletion(Consumer<ResponseEntity<String>> con) {
        this.con = con;
    }

    @Override
    void run(ResponseEntity<String> val) {
        con.accept(val);
    }
}

public static class ErrorCompletion extends Completion{
    Consumer<Throwable> econ;
    //listenablefuture 실패 시 받는 throwable 처리
    public ErrorCompletion(Consumer<Throwable> econ) {
        this.econ = econ;
    }

    @Override
    void run(ResponseEntity<String> val) {
        //정상적일때 실행되면 안됨; 패스
        if(next != null){
            next.run(val);
        }
    }

    @Override
    void error(Throwable e) {
        econ.accept(e);
    }
}

public static class ApplyCompletion extends Completion{
    Function<ResponseEntity<String>, ListenableFuture<ResponseEntity<String>>> fn;
    public ApplyCompletion(Function<ResponseEntity<String>, ListenableFuture<ResponseEntity<String>>> fn) {
        this.fn = fn;
    }

    @Override
    void run(ResponseEntity<String> val) {
        ListenableFuture<ResponseEntity<String>> lf = fn.apply(val);
        lf.addCallback(s -> complete(s), e-> error(e));
    }
}

public static class Completion{
    Completion next;

    public static Completion from(ListenableFuture<ResponseEntity<String>> lf) {
        Completion c = new Completion();

        lf.addCallback(s -> {
            c.complete(s);
        }, e -> {
            c.error(e);
        });
        return c;
    }

    void error(Throwable e) {
        if(next != null){
            next.error(e);
        }
    }

    void complete(ResponseEntity<String> s) {
        if(next != null){
            next.run(s);
        }
    }

    void run(ResponseEntity<String> val) {
    }

    public Completion andApply(Function<ResponseEntity<String>, ListenableFuture<ResponseEntity<String>>> fun){
        Completion c = new ApplyCompletion(fun);
        this.next = c;
        return c;
    }

    public void andAccept(Consumer<ResponseEntity<String>> con){
        Completion c = new AcceptCompletion(con);
        this.next = c;
    }

    public Completion andError(Consumer<Throwable> econ){
        Completion c = new ErrorCompletion(econ);
        this.next = c;
        return c;
    }
}

위와 같이 만들자니 세 번째 콜을 아래와 같이 추가할 때 형 변환 에러가 난다.

  .andApply(s -> myService.work(s.getBody)

andApply는 request로 ResponseEntity<String>을 주고 response로 ListenableFuture<ResponseEntity<String>>를 받아야 하지만 work 함수는 그렇지 않다.

그러면 저 request/response를 만족하는 같은 내용의 함수를 또 작성해야 하는가?

뭐 그래도 작동은 하겠지만, 매번 함수를 작성하는 것은 깔끔하지 못하기에 generic을 통해 해결한다.

public static class AcceptCompletion<S> extends Completion<S, Void>{
    Consumer<S> con;
    public AcceptCompletion(Consumer<S> con) {
        this.con = con;
    }

    @Override
    void run(S val) {
        con.accept(val);
    }
}

public static class ErrorCompletion<T> extends Completion<T, T>{
    Consumer<Throwable> econ;
    //listenablefuture 실패 시 받는 throwable 처리
    public ErrorCompletion(Consumer<Throwable> econ) {
        this.econ = econ;
    }

    @Override
    void run(T val) {
        //정상적일때 실행되면 안됨; 패스
        if(next != null){
            next.run(val);
        }
    }

    @Override
    void error(Throwable e) {
        //계속 타고온 에러를 처리
        econ.accept(e);
    }
}

public static class ApplyCompletion<S, T> extends Completion<S, T>{
    Function<S, ListenableFuture<T>> fn;
    public ApplyCompletion(Function<S, ListenableFuture<T>> fn) {
        this.fn = fn;
    }

    @Override
    void run(S val) {
        ListenableFuture<T> lf = fn.apply(val);
        lf.addCallback(s -> complete(s), e-> error(e));
    }
}

public static class Completion<S, T>{
    Completion next;

    public static <S, T> Completion<S,T> from(ListenableFuture<T> lf) {
        Completion<S, T> c = new Completion<>();

        lf.addCallback(s -> {
            c.complete(s);
        }, e -> {
            c.error(e);
        });
        return c;
    }

    void error(Throwable e) {
        if(next != null){
            next.error(e);
        }
    }

    void complete(T s) {
        if(next != null){
            next.run(s);
        }
    }

    void run(S val) {
    }

    public <V> Completion<T, V> andApply(Function<T, ListenableFuture<V>> fun){
        Completion<T, V> c = new ApplyCompletion(fun);
        this.next = c;
        return c;
    }

    public void andAccept(Consumer<T> con){
        Completion<T, Void> c = new AcceptCompletion(con);
        this.next = c;
    }

    public Completion<T, T> andError(Consumer<Throwable> econ){
        Completion<T, T> c = new ErrorCompletion<>(econ);
        this.next = c;
        return c;
    }
}


728x90
반응형
반응형

오늘은 5강을 이어서 학습한다.


1. default, blocking request

아래 그림처럼 2초씩 지연이 있는 /service를 요청하는 /rest를 100건 rest template로 요청한다. /rest의 스래드가 한 개라서 2초씩 대기한다.

@Slf4j
public class LoadTest {
    static AtomicInteger cnt = new AtomicInteger(0);

    public static void main(String[] args) throws InterruptedException, BrokenBarrierException {
        ExecutorService es = Executors.newFixedThreadPool(100);

        RestTemplate rt = new RestTemplate();
        String url = "http://localhost:8080/rest?idx={idx}";

        CyclicBarrier barrier = new CyclicBarrier(101);

        for(int i = 0; i <100; i++){
            es.submit(() -> {
                int idx = cnt.addAndGet(1);

                //blocking till await을 만난 숫자가 100에 도달할 때 까지 ; 그 순간에 블라킹이 한번에 풀려; 스레드 동기화 가능; 100개가 동시에 시작
                //throw exception하기 때문에 callable 구현 필요
                barrier.await();

                log.info("thread {}", idx);
                StopWatch s1 = new StopWatch();
                s1.start();

                String res = rt.getForObject(url, String.class, idx);

                s1.stop();
                log.info("elapsed:{} -> {} / {}", idx, s1.getTotalTimeSeconds(), res);
                return null; //callable 구현한 인터페이스라고 생각함
            });
        }

        barrier.await();

        StopWatch sw = new StopWatch();
        sw.start();

        //graceful shutdown이라서 먼저 걸고 기다림
        es.shutdown();
        es.awaitTermination(100, TimeUnit.SECONDS);

        sw.stop();
        log.info("total time {}", sw.getTotalTimeSeconds());
    }
}
@SpringBootApplication
public class Application {

    @RestController
    public static class MyController{
        RestTemplate rt = new RestTemplate();

        //thread 1개
        //2초씩 대기; 톰캣 큐에 대기
        @GetMapping("/rest")
        public String rest(int idx){
            //RestTemplate blocking; 응답올때까지 대기; 스레드가 더 필요로하는 요청이라면 홀딩
            String res = rt.getForObject("http://localhost:8081/service?req={req}", String.class, "hello" + idx);
            return res;
        }
    }


    public static void main(String[] args) {
        SpringApplication.run(Application.class, args);
    }
}

//설정
server.tomcat.threads.max=1
spring.task.execution.pool.core-size=100
@SpringBootApplication
public class RemoteService {

    @RestController
    public static class MyController{
        @GetMapping("/service")
        public String service(String req) throws InterruptedException {
            Thread.sleep(2_000);
            return req + "/service";
        }
    }

    public static void main(String[] args) {
    	//application.properties 오버라이드하는 설정
        System.setProperty("server.port", "8081");
        System.setProperty("server.tomcat.threads.max", "1000");
        SpringApplication.run(RemoteService.class, args);
    }
}
...
12:23:06.118 [pool-1-thread-39] DEBUG org.springframework.web.client.RestTemplate - Reading to [java.lang.String] as "text/plain;charset=UTF-8"
12:23:06.119 [pool-1-thread-39] INFO toby.live.lecture4.LoadTest - elapsed:39 -> 8.463001595 / hello39/service
12:23:08.127 [pool-1-thread-30] DEBUG org.springframework.web.client.RestTemplate - Response 200 OK
12:23:08.127 [pool-1-thread-30] DEBUG org.springframework.web.client.RestTemplate - Reading to [java.lang.String] as "text/plain;charset=UTF-8"
12:23:08.127 [pool-1-thread-30] INFO toby.live.lecture4.LoadTest - elapsed:30 -> 10.472331585 / hello30/service
12:23:10.139 [pool-1-thread-34] DEBUG org.springframework.web.client.RestTemplate - Response 200 OK
12:23:10.139 [pool-1-thread-34] DEBUG org.springframework.web.client.RestTemplate - Reading to [java.lang.String] as "text/plain;charset=UTF-8"
12:23:10.140 [pool-1-thread-34] INFO toby.live.lecture4.LoadTest - elapsed:34 -> 12.485099461 / hello34/service
...

2초 이상이 걸리는 100건의 작업이고 응답을 기다리는 동안은 블로킹되기 때문에 총 200초가량 소요된다. 허나 복잡한 로직도 아니고, 사실 cpu는 놀고 있을 것이다.. 이를 비동기로 바꿔보자.


2. AsyncRestTemplate(spring5.0/springboot2.0에서 deprecated)

위 소스에서 /rest의 rest template만 바꿔본다.

@RestController
public static class MyController{
    AsyncRestTemplate rt = new AsyncRestTemplate();

    //thread 1개
    @GetMapping("/rest")
    public ListenableFuture<ResponseEntity<String>> rest(int idx){
        //호출을 비동기로; 바로 스레드 리턴, 응답이 오면 콜백은 스프링이 알아서; 응답이 오면 이 컨트롤러의 응답이라 생각하고 처리함; 콜백을 처리할 필요 없음
        //비동기를 호출하기 위해 스래드를 백그라운드에 미리 만들어; 자바의 api를 사용해서; 겉으로는 한 스레드에서 처리한 것 처럼 보이지만 사실 서버의 자원을 사용한 것
        ListenableFuture<ResponseEntity<String>> res = rt.getForEntity("http://localhost:8081/service?req={req}", String.class, "hello" + idx);
        return res;
    }
}
...
12:42:49.442 [pool-1-thread-54] INFO toby.live.lecture4.LoadTest - elapsed:54 -> 2.516070823 / hello54/service
12:42:49.444 [pool-1-thread-98] DEBUG org.springframework.web.client.RestTemplate - Response 200 OK
12:42:49.444 [pool-1-thread-12] INFO toby.live.lecture4.LoadTest - elapsed:12 -> 2.513689601 / hello12/service
12:42:49.444 [pool-1-thread-98] DEBUG org.springframework.web.client.RestTemplate - Reading to [java.lang.String] as "text/plain;charset=UTF-8"
12:42:49.445 [pool-1-thread-89] DEBUG org.springframework.web.client.RestTemplate - Response 200 OK
12:42:49.445 [pool-1-thread-89] DEBUG org.springframework.web.client.RestTemplate - Reading to [java.lang.String] as "text/plain;charset=UTF-8"
12:42:49.445 [pool-1-thread-98] INFO toby.live.lecture4.LoadTest - elapsed:98 -> 2.518126106 / hello98/service
12:42:49.445 [pool-1-thread-89] INFO toby.live.lecture4.LoadTest - elapsed:89 -> 2.515622072 / hello89/service
12:42:49.446 [main] INFO toby.live.lecture4.LoadTest - total time 2.527531376

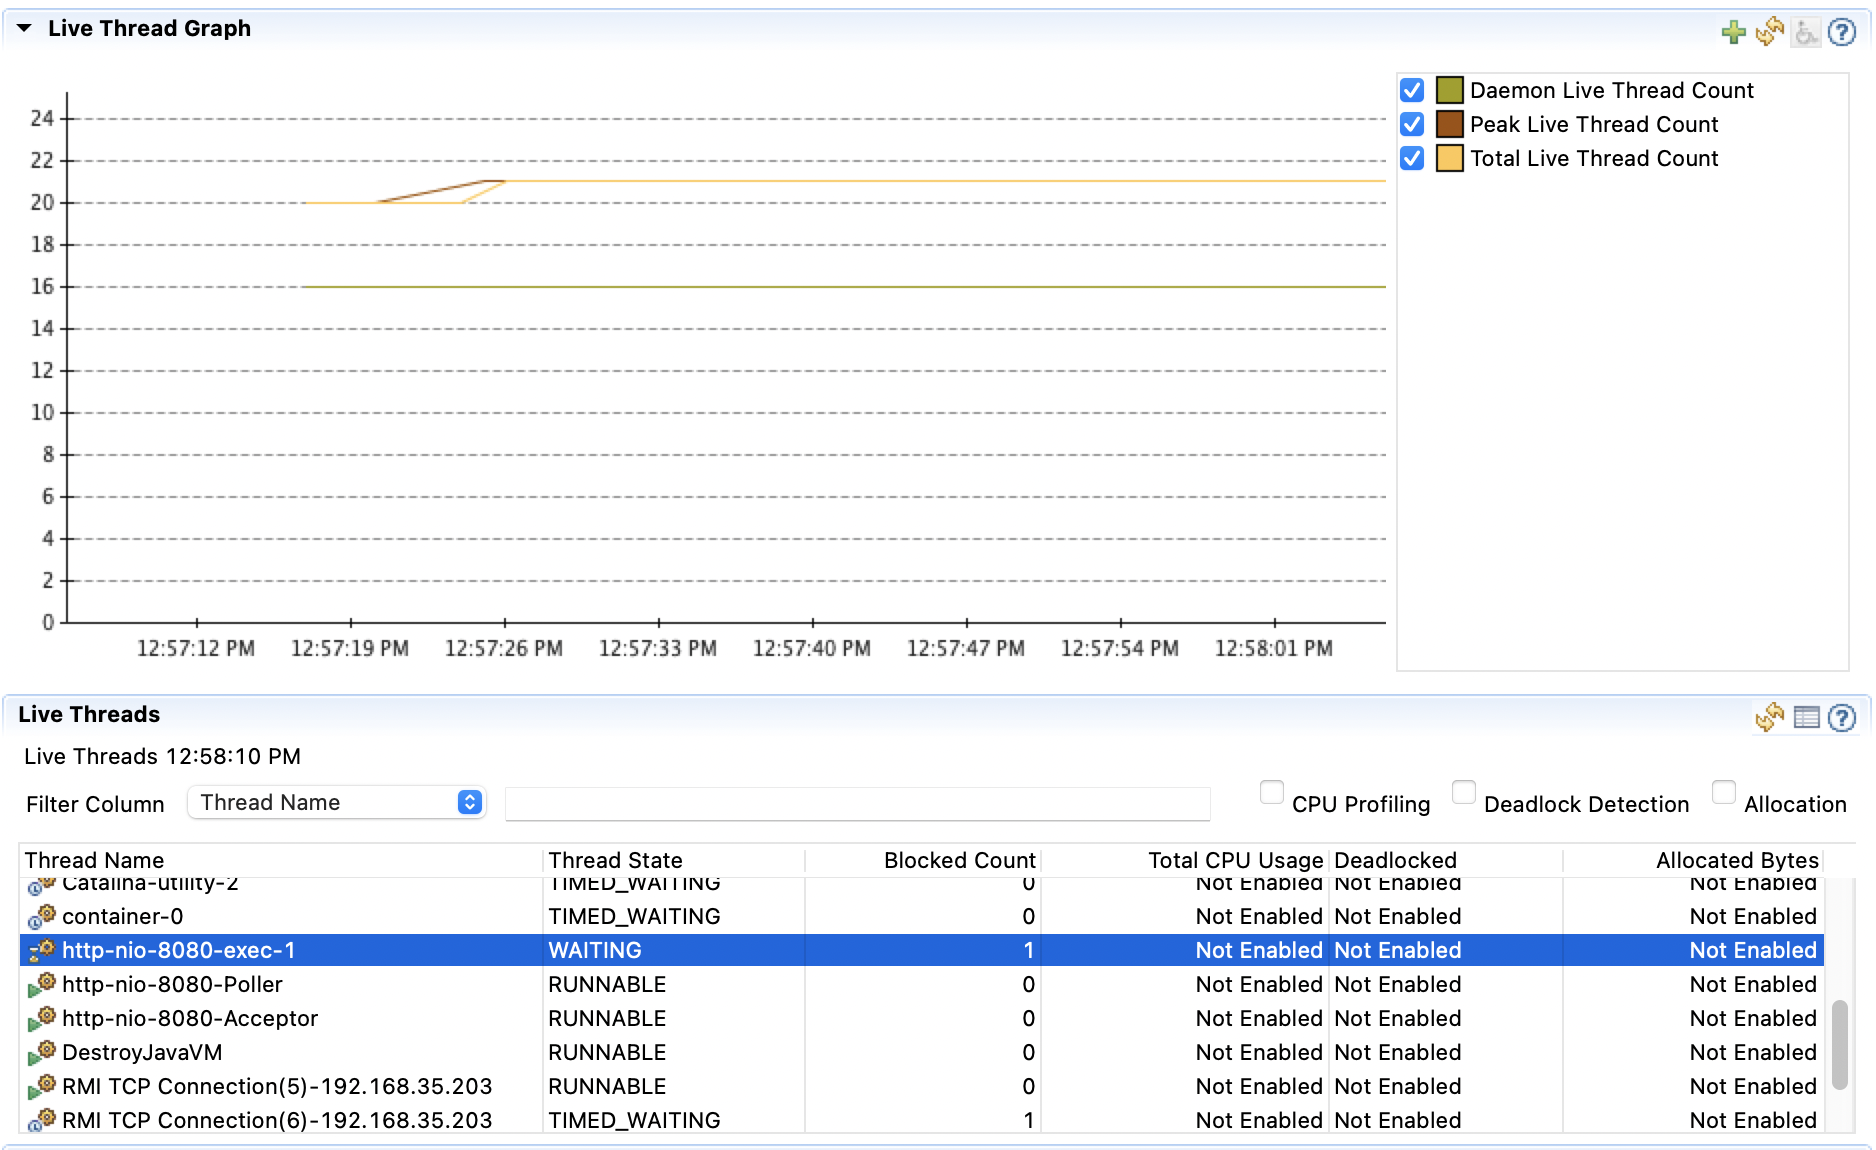
이렇게 실행하면 총 실행시간이 2초 남짓으로 마치 요청 한 건을 한 것과 비슷하게 나온다. 하지만 자바에서 제공하는 분석 툴인 jmc를 이용하여 /rest를 실행한 애플리케이션의 thread의 개수를 확인해보면..

서블랫 스래드는 하나만 만들어져야 하는데, 사실 뒤에서는 100개 이상의 스레드를 추가적으로 생성해서 요청하고 있음을 알 수 있다. 톰캣이 100개의 스레드를 만들었나 싶은데, 사실 톰캣 스래드는 사진에서 보는 것과 같이 하나고, 자바 api를 통해 백그라운드에서 100개 스레드를 만들어 놓고 실행하는 것이다. 즉 매번 서버 자원을 사용한다는 것인데, 이는 비효율적이다. 최소한의 자원을 사용해야 한다.


3. netty / nonblocking io를 사용하는 client lib 사용

/rest 부분의 rest template를 async rest template으로 변경하고 네티를 사용한다. 네티의 스레드를 1개로 설정한다.

@RestController
public static class MyController{
    //Netty4ClientHttpRequestFactory spring 제공
    //netty도 스레드 1개
    AsyncRestTemplate rt = new AsyncRestTemplate(new Netty4ClientHttpRequestFactory(new NioEventLoopGroup(1)));

    //thread 1개
    @GetMapping("/rest")
    public ListenableFuture<ResponseEntity<String>> rest(int idx) throws ExecutionException, InterruptedException {
        log.info("/rest {}", idx);
        //호출을 비동기로; 바로 스레드 리턴, 응답이 오면 콜백은 스프링이 알아서; 응답이 오면 이 컨트롤러의 응답이라 생각하고 처리함; 콜백을 처리할 필요 없음
        //비동기를 호출하기 위해 스래드를 백그라운드에 미리 만들어; 자바의 api를 사용해서; 겉으로는 한 스레드에서 처리한 것 처럼 보이지만 사실 서버의 자원을 사용한 것
        ListenableFuture<ResponseEntity<String>> res = rt.getForEntity("http://localhost:8081/service?req={req}", String.class, "hello" + idx);
        return res;
    }
}

그리고 실행을 하면 처음에는 3초가 걸리고, 다시 또 실행을 하면.. 8초가 걸리고..  다시 실행하면 timeout이 난다..

토비님과는 다른 결과.. 왜지ㅠ

...
15:13:45.147 [pool-1-thread-64] INFO toby.live.lecture4.LoadTest - elapsed:64 -> 3.230518378 / hello64/service
15:13:45.148 [pool-1-thread-82] INFO toby.live.lecture4.LoadTest - elapsed:82 -> 3.229926106 / hello82/service
15:13:45.148 [pool-1-thread-53] INFO toby.live.lecture4.LoadTest - elapsed:53 -> 3.229702047 / hello53/service
15:13:45.148 [pool-1-thread-62] INFO toby.live.lecture4.LoadTest - elapsed:62 -> 3.229505908 / hello62/service
15:13:45.149 [main] INFO toby.live.lecture4.LoadTest - total time 3.242286844

...
15:15:27.268 [pool-1-thread-60] INFO toby.live.lecture4.LoadTest - elapsed:60 -> 8.542415481 / hello60/service
15:15:27.268 [main] INFO toby.live.lecture4.LoadTest - total time 8.556960287

...
15:18:02.122 [pool-1-thread-26] DEBUG org.springframework.web.client.RestTemplate - Response 503 SERVICE_UNAVAILABLE
15:18:02.124 [pool-1-thread-18] DEBUG org.springframework.web.client.RestTemplate - Response 503 SERVICE_UNAVAILABLE
15:18:02.124 [pool-1-thread-3] DEBUG org.springframework.web.client.RestTemplate - Response 503 SERVICE_UNAVAILABLE
15:18:02.126 [pool-1-thread-12] DEBUG org.springframework.web.client.RestTemplate - Response 503 SERVICE_UNAVAILABLE
15:18:02.129 [main] INFO toby.live.lecture4.LoadTest - total time 30.97585281


타임아웃이 나는 현상을 지켜보니 아래와 같은 순서로 진행되었다.

  1. LoadTest -> /rest로 100건 요청 
  2. /rest에서 100건 요청받고 -> /service로 요청해야 하는데 /service 쪽 로그에 아무것도 안 찍힘
  3. 1분 뒤에 /rest에서 async request timeout exception 걸려서 503 return
  4. 그 후에 /service가 요청을 받아서 처리 하지만 /rest에서는 이미 exception 처리돼서 무쓸모

왜 /rest는 요청을 바로 받는데 /service로 바로 안 보내고 1분 후에 한 번에 보내는 걸까.. block 되어 있는 건가..

/rest가 1개의 스레드에서 도는데 어디선가 블라킹이 있어서 안 되는 것 같은데, 왠지 모르겠다. 느낌은 저 시대와 지금의 기본적인 풀 세팅 정보가 달라서 그럴 것 같다.


어쨌건 스레드를 100개씩이나 더 생성하지 않는 것은 확인했다.


자꾸 타임아웃이 나지만 우선은 진행한다.

ListenableFuture로 응답을 그대로 내리면 응답을 꺼내서 수정할 수가 없다. 이때 사용 가능한 것이 DeferredResult이다.

ListenableFuture에 콜백을 달고 DeferredResult에 setResult를 하면 응답을 수정할 수 있다

@GetMapping("/rest")
public DeferredResult<String> rest(int idx) throws ExecutionException, InterruptedException {
    log.info("/rest {}", idx);
    DeferredResult<String> dr= new DeferredResult<>();
    
    ListenableFuture<ResponseEntity<String>> res = rt.getForEntity("http://localhost:8081/service?req={req}", String.class, "hello" + idx);
    //res.get -> blocking 으로 바뀌어버림 의미없음
    //callback이 실행되는거지 리턴을 주는게 아님; 응답을 받고 변형하려면? deferredReuslt!
    res.addCallback(s -> {
        dr.setResult(s.getBody() + "/work");  //응답 변형
    }, e-> {
        //throw 하면 어디서 에러가 난지 알 수 없어 비동기라
        dr.setErrorResult(e.getMessage());
    });

    return dr;
}

중첩 콜을 원한다면..

@GetMapping("/rest")
public DeferredResult<String> rest(int idx) throws ExecutionException, InterruptedException {
    log.info("/rest {}", idx);
    DeferredResult<String> dr= new DeferredResult<>();
    ListenableFuture<ResponseEntity<String>> res = rt.getForEntity("http://localhost:8081/service?req={req}", String.class, "hello" + idx);
    res.addCallback(s -> {
        ListenableFuture<ResponseEntity<String>> f2 = rt.getForEntity("http://localhost:8081/service2?req={req}", String.class, s.getBody());
        f2.addCallback(s2-> {
            dr.setResult(s2.getBody());
        }, e2-> {
            dr.setErrorResult(e2.getMessage());
        });
    }, e-> {
        //throw 하면 어디서 에러가 난지 알 수 없어 비동기라
        dr.setErrorResult(e.getMessage());
    });
    return dr;
}

2초짜리 콜을 2번 중첩해서(/service2는 /service의 카피본이다) 4초가량이 걸린다. (하지만 역시 나는 위와 같은 현상이 계속되어서 안되었다..)


3번 중첩한다면..

@Slf4j
@EnableAsync
@SpringBootApplication
public class Application {
    @RestController
    public static class MyController{
        //Netty4ClientHttpRequestFactory spring 제공
        //netty도 스레드 1개
        AsyncRestTemplate rt = new AsyncRestTemplate(new Netty4ClientHttpRequestFactory(new NioEventLoopGroup(1)));

        @Autowired
        MyService myService;

        static final String URL1 = "http://localhost:8081/service?req={req}";
        static final String URL2 = "http://localhost:8081/service2?req={req}";

        //thread 1개
        @GetMapping("/rest")
        public DeferredResult<String> rest(int idx) {
            log.info("/rest {}", idx);
            DeferredResult<String> dr= new DeferredResult<>();

            ListenableFuture<ResponseEntity<String>> f1 = rt.getForEntity(URL1, String.class, "f1" + idx);
            f1.addCallback(s -> {
                ListenableFuture<ResponseEntity<String>> f2 = rt.getForEntity(URL2, String.class, s.getBody());
                f2.addCallback(s2 -> {
                    ListenableFuture<String> f3 = myService.work(s2.getBody());
                    f3.addCallback(s3 -> {
                        dr.setResult(s3);
                    }, e3 -> {
                        dr.setErrorResult(e3.getMessage());
                            }
                    );
                }, e2-> {
                    dr.setErrorResult(e2.getMessage());
                });
            }, e-> {
                dr.setErrorResult(e.getMessage());
            });
            return dr;
        }
    }

    @Service
    public static class MyService{
        @Async
        public ListenableFuture<String> work(String req){
            return new AsyncResult<String>(req + "/asyncwork");
        }
    }

    @Bean
    ThreadPoolTaskExecutor myPool(){
        ThreadPoolTaskExecutor te = new ThreadPoolTaskExecutor();
        te.setCorePoolSize(1);
        te.setMaxPoolSize(1); //queue까지 다 차면 맥스
        te.initialize();
        return te;
    }

    public static void main(String[] args) {
        SpringApplication.run(Application.class, args);
    }
}

주의해야 하는 것은 어디서든 다 async, 비동기가 되게끔 작성해야 한다는 것, 아니면 순식간에 동기로 바뀐다.


728x90
반응형

+ Recent posts